Dienstag, 3. Dezember 2013

Häkeln für Weihnachten

Klingt altmodisch, ist es aber nicht. Denn Amigurumi ist auch Häkeln. Und es entstehen dadurch ganz tolle Figuren. In den letzten Tagen ist, passend zur Weihnachtszeit, ein Elch entstanden. Hach diese süßen Dinger eignen sich ja auch immer perfekt als Dekoration. Doch dieser Elch bleibt nur noch bis zum Heiligen Abend bei uns. Als Geschenk verpackt tritt er dann die weite Reise zu meiner Schwester an, die ihm dann ein nettes zuhause geben wird.

Amigurumi Moose


Crochet for christmas

sounds old-fashioned, but it isn't. Amigurumi is also crochet. And you can make so many cute figures. In the last few days, suitable for christmas time, a moose was finished. This cute figures are so perfect for decoration. But this moose stays only till the holy night in our home. Wrapped as a present the moose will going to travel to my sister and she will give him a very sweet home.

Einen schönen Tag / Have a nice day

Yvonne

PS: Bevor ich es vergesse, die Anleitung für diesen süßen Elch habe ich von Stacey

PS: Before I forgot to tell you, the pattern for this moose is from Stacey

Sonntag, 1. Dezember 2013

Der Adventskranz 2013....

.... ist eigentlich gar kein echter Kranz. In diesem Jahr wollte ich keinen Kranz machen. Dieses Jahr wollte ich etwas spezielles. In meinem Fundus hatte ich noch eine vintage Holzkiste. Diese fand ich perfekt für meinen diesjährigen Adventskranz. Die Kerzen habe ich auf alte Gläser geklebt. Dadurch erhalten sie die unterschiedlichen Höhen. Die Zapfen und die kleinen Fliegenpilze hatte ich zu Hause, das Engelshaar habe ich gekauft. Somit ist mein diesjähriger Adventskranz eine Mischung aus Vintage, Recycling und Neu. Und auch in diesem Jahr ist er wieder handgemacht ;)

Christmas Deco: advent wreath

Advent wreath 2013....

....is actually not a real wreath. This year I didn't make a classic wreath. This year I want to do something special. In my fundus I found an old vintage wooden box. Perfect for my "wreath". The candles are glued to old jars. So you got some different highs between the candles. The pincones and the fly agarics were also from my fundus, the decohair is new. So my "wreath" in this year is a good mix of vintage, recycling and new things. And this year's wreath is also handmade like the wreaths of the last years.

Ich wünsche Euch einen schönen 1. Advent
I wish you a nice 1. advent

Yvonne

Samstag, 30. November 2013

Die Rentiere sind los

Und zwar bei uns zu Hause. Für meinen Weihnachtstisch wollte ich außer selbstgebackenen Plätzchen noch eine andere kleine Kleinigkeit für die Gäste haben. Kein Problem. Auch hierfür bin ich bei Pinterest fündig geworden. Rentiere aus Weinkorken. Weinkorken habe ich ja nach meinem damaligen "2 EUR für einen ziemlich großen Sack" Glückskauf noch eine ganze Menge. Ich könnte wahrscheinlich den Fußboden eines ganzen Zimmers damit auslegen und somit den bestaussehendsten Korkfußboden der Welt besitzen. Doch ich schweife wieder einmal ab. Also Weinkorken habe ich genügend im Haus. Gefehlt haben nur Pfeifenputzer in braun, Pompoms in rot und Wackelaugen. Alles mit Heißkleber verbinden und das Ergebnis sieht dann so aus.

decoration: christmas reindeers from wine corks

decoration: christmas reindeers from wine corks

So many reindeers...

... at our home. For my christmas table I want to have not only homemade cookies. So I needed an other small thing for my guests. No problem.  Here again a found a solution on Pinterest. Reindeers from wine corks. Wine corks! I have so much of them, because I made a lucky purchase For only 2 EUR I got a big big bag full with wine corks. Probably I could make the whole floor of an room in our house. So I would have the best looking cork floor in the whole world. But I digress. So wine corks I have enough. It lacked mini cleaning brushes for tabacco pipes in brown, mini pompoms in red and wobbling eyes. I glued every thing with hot glue and that's the result.


eine schöne Vorweihnachtszeit / have a nice pre-christmas season

Yvonne

Donnerstag, 28. November 2013

Die Weihnachtskarten 2013

habe ich heute fertig bekommen. Die Inspiration kam dieses Mal von diesem Blog. Eine tolle Karte. Die Schneeflocke habe ich von meiner Cameo ausschneiden lassen. Und der Rest: ein kleiner Holzknopf, Bakerstwine, Engelshaar und mein extra angeschaffter allererster Weihnachtsstempel. Nun bin ich ja nicht der Experte für selbstgemachte Karten, aber auch für mich war diese Karte sehr leicht zu machen. Und irgendwie wirkt sie doch sehr edel. Finde ich.

cardmaking: christmas card 2013

the christmas cards 2013...

I've finished today. The Inspiration to made this card came from this blog. A wonderful card. The snowflake cuted out my "Cameo". And the Rest: a little wooded button, bakers twine, decoration stuff that calls "anglehair" and my specially relating to purchased the very first Christmas stamps. Well, I'm not an expert in handmade cards, but this card was very easy to make for me. And I think she looks very classy.

Eine schöne Vorweihnachtszeit / a nice pre-christmas season

Yvonne

Sonntag, 24. November 2013

Auch ohne Schnee....

kommt ja so langsam das Weihnachtsfeeling auf. In diesem Jahr versammelt sich zum ersten Mal die ganze Familie bei uns zu daheim. Da gibt es also so einiges vorzubereiten, zu organisieren und zu dekorieren. Nun, allzulang ist es ja nicht mehr hin, dann ist schon Weihnachten. Also heißt es eben derzeit: weg mit den Scrapsachen, die Weihnachtsdeko ruft. Gesagt getan. Dank Pinterest ist es ja mittlerweile gar nicht mehr so schwer eine tolle Idee für die Weihnachtsdeko zu finden. Hach aber was man dafür immer alles so braucht. Gut, also habe ich erst einmal das Internet durchforstet auf der Suche nach den perfekten Zapfen, Kunstschnee, Tischdecken, Leinenstoff, Kerzen.......
Eben alles, was Frau so für die perfekte Deko braucht ;)
Und da ich eben nicht nur bestellt habe, sondern auch schon fleißig am Dekobasteln bin, wollte ich euch heute mal einen kleinen Zwischenstand geben.

Die Tür- und eine der Fensterdekos sind schon fertig. Inspiriert haben mich dieser Post und dieser Pin auf Pinterest.
Für die Türdeko brauchte ich außer Zapfen, Organzaband, weißer Farbe und Kunstschnee nur noch Sprüh- und Heißkleber und Geduld. Naja aber Spass hatte ich ;)

decoration: christmas door deco

Und nun zu den Sternen. Meine sollten ebenfalls aus Buchseiten sein. Ein altes Buch war schnell gefunden und die Sterne sind auch sehr einfach zu machen. Etwas geduldig muss man nur beim Kleben sein. Ja und ratzfatz kam der Suchtfaktor ins Spiel. Nach 5 Stück musste ich mich erst einmal bremsen. Schließlich kann ich ja nicht jedes Fenster mit den Sternen behängen. Sollte allerdings an unserem Weihnachtsbaum noch etwas Platz sein, könnte ich noch das ein oder andere Sternchen machen.
Leider sind die Bilder jetzt nicht so toll geworden, aber ich denke, man kann die Sternengirlande trotzdem erkennen.

decoration: christmas star garland window deco

decoration: christmas star garland window deco

decoration: christmas star garland window deco


Für heute war das erst einmal genug Weihnachten. Aber, ich hab da noch so Einiges auf meiner To-Do-Liste. Es gibt also bald noch mehr zu sehen.

Yvonne


Even without snow...

...so slowly christmas feeling is coming on. This year the whole family come together in our home for the first time. And so there is so many to prepair, to organize and to decorate. Well, it's not  so much time to christmas. So that's the motto: no time for scrapbooking, it's time for christmas decoration. No sooner said than done. Because of Pinterest it's so easy to find some good ideas for christmas deco. Hmmh, but you'll need so many stuff to do these things. So I scoured the whole internet always looking for the right cones, fake snow, tableclothes, canvas, candles.......
All these things, that a woman need for the perfect decoration ;)
And since I have not just ordered, but also already busy working on it, I deliver insight into my work.

The decoration for the door an for the window is already finished. I was inspired by this Post and by this Pin on Pinterest.
For the door decoration I needed except cones, organza ribbon, white color and fake snow just spray glue and hot glue and patience. But I had fun ;)
And now up to the stars. My stars should also made from book pages. I found an old book very quickly and the stars are very simple to made. You need some patience if you glue the stars. And at a rate of knotes, I was adicted. After 5 stars I had to finished my work because I cannot decorate every window in my home with those stars. But if there is any space on our christmas tree, I can made some more stars.
The pictures of my star garlande are not the best, but I think, you can spot my garland.

So that's enough christmas for today. But there are much more things on my to-do-list for christmas decoration. Well, you can see more stuff,soon. I promise!

Yvonne

Dienstag, 19. November 2013

Ausbeute vom Treffen Part II

Na haben euch die letzten Alaska Layouts gefallen? Wenn ja, dann seid ihr sicherlich erfreut darüber, dass heute die nächsten 3 Layouts gezeigt werden. Auch sie sind auf dem Treffen der Scrapfamily entstanden. Hach ich bin so froh darüber, dass meine Muse zu mir zurück gefunden hat. Aber ich schweife ab. Nun zu den Layouts:

Well have you liked the last Alaska layouts? If so, then you are certainly pleased that today the next 3 layouts are shown. I made this Layouts on the meeting of the "Scrapfamily", too. I'm so glad, that my muse has found back to me. But I degress ;). So now on to the layouts.

"got some fish?"

der einzigste Bär an den Brooks Falls musste selbstverständlich ein eigenes Layout bekommen. Passend hierfür fand ich das Papier "Ocean Vintage" von BoBunny. Mit einer Mask und Spachtelmasse habe ich den Hintergrund für mich noch etwas passender gestaltet. Auch habe ich zum 1. Mal mit Gelatos gearbeitet. Fällt vielleicht nicht so auf, da ich einen grauen benutzt habe. Gestempelt habe ich ebenfalls in Grau. Abschließend noch etwas Washi und Filmstrips und die üblichen Wood Veneers. Und das Layout ist fertig.

Scrapbooking: Alaska: Got some fish?


the only bear to the "Brooks Falls" had of course get his own layout. I found that BoBunny's "ocean vintage" is perfect for the background. To get more structure in the background I used a mask and structure paste. At this layout I worked for the first time with Gelatos. Maybe it's not so visible because the Gelato was gray. For the stamps I used gray, too. Finally some washi, a filmstrip and the usual wood veneers. That's it.

Scrapbooking: Alaska: Got some fish?


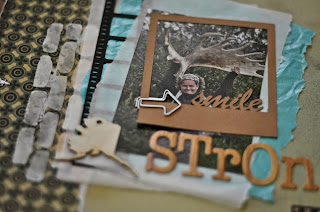
"strong enough?"

Bei unserem Ausflug in das "Valley of 10.000 smokes" habe ich diese Hälfte eines Elchgeweihs gefunden. Viel zu groß um es mit nach Hause zu nehmen. (Leider) Aber ein Photo haben wir trotzdem gemacht. Da das Geweih ziemlich schwer ist (es war nur eine Hälfte) passte der Titel wie die Faust auf's Auge.  Für das Layout selbst habe ich nur wenige Zutaten benötigt. Etwas Butterbrotpapier und das türkise Seidenpapier vom Parfumriesen um das Foto zu matten und einen layered Look zu erzeugen. Cardstock von "Stampin' up!" kombiniert mit einem Papierrest aus der "MamaRazzi2" Serie. Die Alphas sind mit einem Holzlook versehen und entstammen meinem Fundus. Sie sind schon etwas älter aber immer noch gut ;). Filmstreifen und Polaroidrahmen habe ich von meiner Cameo ausschneiden lassen.

Scrapbooking: Alaska: Strong enough?

During our trip to "The valley of 10.000 smokes" I've found this half of a moose antler. Too much too big to take it at home. So sadly. But we have taken a picture. The half of the antler was so heavy, so the titel of the layout was so appropriated. For this layout you don't need so much. Some sandwich paper and some turquoise tissue paper from a great perfume shop to mat the foto an to give the layout a layered look. The Cardstock is from Stampin' Up! combined with an scrap of a paper from the "MamaRazzi2" series. The Alphas are very old and from my alpha pool ;) Filmstrip and polaroid frame were cutted of my "Cameo".

Scrapbooking: Alaska: Strong enough?

"wo ist er hin?"

Bei diesem Layout habe ich lediglich eine Mask, Chevron Stanzreste, und "Vintage Photo" vom Ranger Tim Holtz benutzt. Mit Hilfe der Mask habe ich die kleinen Punkte im Hintergrund gemacht und den Stanzrest habe ich als Negativ benutzt um das Chevron Muster zu erzeugen. Dann habe ich noch an einigen Stellen auf dem Layout etwas Stempelfarbe aufgetragen und mit einem Wassertankpinsel verwischt. die Fotos sind mit gestanzten Papierresten aus der MamaRazzi2 Serie hinterlegt. Um den "Naturlook" zu untermalen, sind die Alphas im Korklook und die Pfeile aus Kork.
Ach ja und das Patterned Paper ist ebenfalls von BoBunny und zwar "Chiffon Journal". Hach ich liebe dieses Papier von BoBunny.
 
Scrapbooking: Alaska: Matanuska Glacier: Where he's gone?
 

"where he's gone?"

For this layout I have used only a mask, Chevron punching residues and "Vintage Photo" by Ranger Tim Holtz. With the mask a made the little dots in the background. And the punching residues used as a negative to make the chevron pattern. Then I gave some stamp color to the right places on the patterned paper and blured the color with a watertank brush. For the "natural look" I chose cork styled alphas and cork arrows. Ah! And the patterned paper is also from BoBunny. It's "Chiffon Journal". Hmmmmh I like the paper from BoBunny so much.

Scrapbooking: Alaska: Matanuska Glacier: Where he's gone?

So für heute habt Ihr es geschafft. Das waren also 3 weitere Layouts vom Treffen und auch vom Alaska Urlaub. Ich hoffe euch gefallen die Layouts und das eine oder andere dient als Vorlage für einen Lift ;)

That's it for today. This were 3 more layouts from the meeting of the "Scrapfamily" and 3 more layouts of our vacation in Alaska. Hopefully you like my layouts and maybe somebody take them for a lift. 

Bis bald / See you 

Yvonne 
Samstag, 16. November 2013

Ausbeute vom Treffen - Part I

Heute zeige ich euch die ersten 3 Layouts, die auf dem Treffen der "Scrapfamily" entstanden sind. Da ich ja am Urlaubsalbum unserer Alaskareise arbeite, handeln diese Layouts natürlich von unserer Reise. Wir haben so viele Dinge getan und erlebt. Es wird wohl wieder einmal ein dickes Album werden. Aber nun zu den Layouts.

Today I show you the first three layouts from the fall meeting of the "Scrapfamily". At the moment I scrap for the album for our roadtrip through alaska. So every layout tell a story of our journey. We've done so may things an got so many experiences. There are so many memories to storage and I think it will be a very thick album. But now, the layouts.

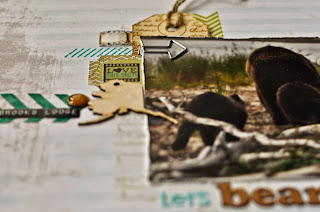
"Let's Bear Walk"
Auf diesem Layout habe ich ein Foto einer Bärenmutter mit ihren 2 Jungen verscrappt. Das Bild habe ich am Strand des Naknek Lake in Brooks Lodge gemacht. Ich liebe dieses quadratische Fotoformat. Da braucht es gar nicht mehr viel dazu. Etwas Washi und ein paar Embellies und fertig. 

For this layout I used a picture of a bear mom with two little spring cubs. I took this picture at the beach of Naknek Lake in Brooks Lodge. I love this square format of the picture. It doesn't need much more. Only some few embellies and a little strip of washi tape. That's it.

Scrapbooking: Alaska: let's bear walk

Scrapbooking: Alaska: let's bear walk


"Glacier Shooting"
Bei unserem Rundflug um Mt. McKinley haben wir eine Landung auf dem Eldridge Gletscher gehabt. Dabei sind diese Bilder entstanden. Das Patterned Paper ist aus der Serie "So ist das Leben" von der Scrapbook Werkstatt.

The pictures for this layout were shot during a glacier landing on Eldridge Glacier. The glacier landing was a part of our scenic flight around Mt. McKinley. I used patterned paper from the series "So ist das Leben" designed for "Scrapbook Werkstatt".

Scrapbooking: Alaska: glacier shooting


"Pfffff"
Auf diesem Layout habe ich den Reifenplatzer an unserem Wohnmobil verscrappt. Auf den Schotterpisten von Alaska kann soetwas schon einmal vorkommen. Da uns dieses Ereignis in Aufruhr versetzte, musste daraus ein Layout entstehen. Beim Patterned Paper kam wieder "MammaRazzi2" zum Einsatz. Um den geplatzten Reifen besser in Szene zu setzen, habe ich den Reifen vergrößert und als seperates Bild mit Abstandspads auf das Layout gebracht. Der Polaroidrahmen aus Vellum und die Wood Veneer Chevrons lenken die Aufmerksamkeit noch mehr auf den geplatzten Reifen. Damit sich der Titel des Layouts besser vom Hintergrund abhebt, habe ich ihn noch mit einem schwarzen Stift umrandet.

This Layout named "pffff" because of the flat tire that we had. It happened some times on alaska gravel roads. This event enabled us to revolt and so I had to scrap a layout. The patterned paper is also from the "MammaRazzi2" series. To set the flat tire in scene, I enlarged the tire and give an extra picture to the layout. With 3d pads I've given the layout more deepness. The polaroid frame and the wood veneer chevrons draw attention to the flat tire. So that the title stands out better from the background, I've outlined the alphas with a black pen.

Scrapbooking: Alaska: Pffff


So, für heute ist es wohl genug. Die anderen Layouts gibt es in den nächsten Tagen.
So, that's enough for today. More Layouts I will show you in some days.

Yvonne


Samstag, 9. November 2013

und wieder fleißig

Ich hab es euch ja schon angekündigt. Ein weiteres Layout für das Urlaubsalbum ist fertig und wartet auf seine Veröffentlichung. Und heute ist es so weit. Ich präsentiere euch "Going to Brooks". Ein Layout welches unseren Trip nach Brooks Lodge huldigt. Für das Abenteuer "Brooks Lodge" mussten wir einen Inlandsflug von Anchorage nach King Salmon nehmen und von dort aus ging es weiter mit dem Wasserflugzeug. Ein Abenteuer, welches in einem Layout festgehalten werden musste.
Für das Layout habe ich ein Patterned Paper aus der Serie "MammaRazzi2" von BoBunny genutzt.
Die Fotos sind distressed und auf einen Kartenausschnitt von Alaska geklebt. Unsere ungefähre Flugroute habe ich mit einer gestrichelten roten Linie markiert, Start- und Zielpunkt jeweils mit einem schwarz eingefärbten Wood Veneer Pfeil markiert und die Flugroute mit einem rot eingefärbten Wood Veneer Flugzeug aufgepeppt. Noch ein paar passende Embellies dazu und fertig ist das Layout.

Scrapbooking: Going to Brooks

Scrapbooking: Going to Brooks

Und für die nächsten Layouts ist auch schon gesorgt. Am letzten Wochenende war unser Herbsttreffen der "Scrapfamily" und meine Muse ist mir treu geblieben. Somit konnte ich im Kreise meiner Scrapfreunde 9 weitere Layouts fertig stellen. Die gibt es heute aber nicht zu sehen, sondern erst in den nächsten Tagen.


busy again
I have already announced. Another layout for our vacation album is finished and is waiting for the release. And today is the day. Tada!! I present you "Going to Brooks". A layout that pays tribute to our trip to Brooks Lodge. We had to take a domestic flight from Anchorage to King Salmon. And from King Salmon, we took a seaplane to Brooks Lodge. An Adventure that had to be hold in a layout.
For this layout I used Patterned Paper from the "MamaRazzi2" series from BoBunny. All the pictures are distressed. For the background of the pictures I used a peace from an alaskan map. The flight route I marked with a red dashed line, start an target points was marked with a black colored wood veneer arrow and the flight route was spiced up with an red colored wood veneer airplane. I added some embellies and the layout was finished. 

And some more layouts were also finished.  Last weekend I met my Scrapfriends at our fall meeting of the "Scrapfamily"and my muse spent the whole time with me. So I scrapped in summery 9 layouts. But today I don't show you the 9 layouts, because I need some stuff for the next few days ;).


einen schönen Abend noch / have a nice evening

Yvonne


Montag, 28. Oktober 2013

Endlich, es geht los!

Juhu, mich hat die Muse geküsst. Seit ca. einer Woche schießen mir die Ideen nur so in den Kopf. Und, was viel wichtiger ist. Dort bleiben sie auch. Nein, die Lust zum Scrappen verlässt mich nicht wieder sobald ich am Scraptisch sitze. Also habe ich das doch gleich mal ausgenutzt und mit dem Urlaubsalbum angefangen. Auch in diesem Jahr waren wir wieder in Alaska und es gibt viele tolle Eindrücke und Fotos zu verscrappen. Die ersten zwei Layouts sind nun fertig, ein drittes liegt hier und muss noch geknipst werden.

Today I got a kiss from my muse. Since abot one week I got so many ideas for scrapbooking layouts. And what's more important. They stay in my mind. No,  the joy of scrapping leave me not, when I sit on my scraptable. So that's the reason why I startet our vacation album. This year we spend our holidays in Alaska, too. So there are so many impressions and photos for scrapbooking. I finished 3 Layouts, but today I show you only two of three. So enjoy!

Alaska 2013:
Hach war ich kreativ. Ich weiß gar nicht mehr, wie ich überhaupt auf diese Idee gekommen bin. Auf jeden Fall habe ich mir mit meinem Fotobearbeitungsprogramm einen Umriss von Alaska geöffnet und dahinein all unsere Reiseziele eingetragen. Danach habe ich das Bild vom Labor meines Vertrauens entwickeln lassen und konnt dieses Layout zaubern.

At this layout I was so creativ. I dont know, from where I got my inspiration. But I opened an outline of the state of Alaska and filled the outline with all of our destinations in Alaska. After the photoprinting I create this layout.

Scrapbooking: Lot to do in Alaska

Scrapbooking: Lot to do in Alaska


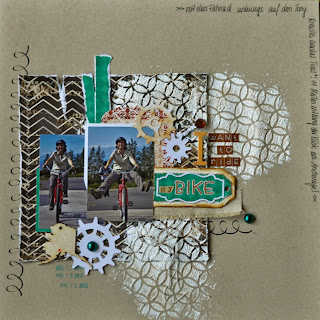
I want to ride my bike:
Hier habe ich mich der Serie "MamaRazzi2" von BoBunny bedient. Außerdem habe ich mit Hilfe einer Mask Strukturpaste aufgetragen und dadurch ein tolles Muster erzeugt.

At this layout I used the "MamaRazzi2" series from BoBunny. With structure paste and a mask I create this beautiful pattern in the background.

Scrapbooking: I want to ride....

Scrapbooking: I want to ride....


Einen schönen Abend wünscht
Have a beautiful evening. See you

Yvonne

Sonntag, 13. Oktober 2013

Neue Deko

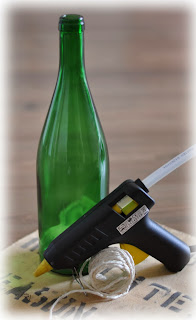
Heute melde ich mich mal wieder mit einer selbstgemachten Deko für unser Wohnzimmer. Dieses Mal habe ich ein paar gutaussehende leere Flaschen 'upsycled'. Dazu ist gar nicht viel notwendig. Ihr braucht lediglich:
  • leere Flasche
  • etwas Paketschnur oder anderen Strick
  • Heißkleber
Decoration: wrapped bottle
Dann wird der Strick schön gleichmäßig um die Flasche gewickelt und ab und an mit Heißkleber an die Flasche geklebt. Und schon ist eine neue Deko für die Wohnung entstanden. Ohne viel Material, ohne viel Kosten, aber sehr schön anzusehen.
Und das ganze hatte noch etwas Gutes. Mein Mann hatte weniger Flaschen in den Glascontainer zu bringen ;)
Probiert es doch einfach mal selber aus. Es wir euch sicherlich gefallen.

Decoration: wrapped bottle


Today I will show you an idea for a do it yourself decoration. This time i 'upsycled' a nice bottle. For this you don't need so much materials. Only:
  • an empty nice bottle
  • craft twine
  • hot glue
Wrap the craft twine evenly araund the bottle an secure the twine from time to time with hot glue. That's it. You finished your handmade home decoration. Without much material, without many costs but very nice to look at.
And there was another good reason to do this. My husband had to bring less bottles to the glas recycling container ;)
So tried it. You will enjoy the 'upcycling'

Ich wünsch euch noch einen schönen Sonntag
Have a nice sunday

Yvonne

Montag, 7. Oktober 2013

Saison beendet

Langsam aber sicher wird es ja merklich kälter. Somit haben wir das Klettern am Fels für dieses Jahr beenden müssen. Und wie könnten wir die Saison besser abschließen, als mit einem schönen Kletterwochenende. Das letzte Wochenende war dafür ja prädestiniert dafür. So sind wir am Donnerstag morgen zu unseren Kletterfreunden nach Salzburg aufgebrochen um gemeinsam mit ihnen den Freitag und den Samstag mit Klettern zu verbringen. Zum Glück hat das Wetter auch ordentlich mitgespielt und wir konnten zum 2. Mal in diesem Jahr den Plombergstein unsicher gemacht.

Klettern: Plombergstein

Zur freitäglichen Mittagszeit sind wir in das "Flipperl" eingestiegen. Oben angekommen, konnten wir auch wieder die tolle Aussicht auf den Wolfgangsee genießen. Samstag morgen waren wir uns erst ein wenig uneinig, denn das Wetter lud nicht unbedingt zum Klettern ein. Nach demokratischer Abstimmung sind wir aber trotzdem aufgebrochen und haben nichts bereut. Der Fels der "Taxus" war trocken und das Wetter hat gehalten.

Klettern: Plombergstein

Nach dem Eintrag ins Gipfelbuch und nachdem wir das Equipment zusammen gepackt hatten, begann der Regen. Also: scheinbar alles richtig gemacht ;)
Eingerissenen Finger und blaue Flecke sind selbstverständlich auch wieder mit dabei. Die Rückfahrt am Sonntag war mal wieder der Horror. Wir waren, dank dem Heimreiseverkehr zwecks des verlängerten Wochenendes, viel zu lange auf der Autobahn und viel zu spät erst wieder zu Hause.
Doch wir hatten ein super tolles Wochenende. Gutes Essen, gute Getränke, ein super Programm. Vielen lieben Dank, Wolfgang & Sabine und bis zum nächsten Mal.

Klettern: Plombergstein

Slowly but surely it will be colder outside. and that's the reason why we have to finished the rock climbing season. So what is more appropriate than a climbing weekend? Last weekend was perfect for this. We had 4 free days. So we start early on thursday to Salzburg in austria, because we wanted to spend our long weekend with our climbing friends. We was very lucky, because the weather was very good and we were able to go out to the Plombergstein for the second time in this year. Friday noon we take the "Flipperl" to climb to the top of the Plombergstein. On the top we were able to enjoy the good view to the "Wolfgangsee". Saturday morning the weather was not so good and we had to make a desicion. After a democratic vote we started to climb and it was the right desicion. The rock of the "Taxus" route was dry and there was no rain during the climb. After the entry in the summit book and after we packed up our climbing equipment it started to rain. We had to do everything right ;)
Of course we got some abrasions at the fingers and some blue marks. That's normal for us. The ride back to home was horrible. All the way to the german autobahns there was traffic jam, because so many people spend there long weekend in the Alpes. So we had to spend to many time at the autobahn and arrived at home much to late. But the weekend was so fantastic. So much good food, so much good drinks and a very good climbing program. Thank you so much Wolfgang & Sabine and see you soon.

Bis bald / see you

Yvonne

Donnerstag, 5. September 2013

Wieder da

Ich wollte mich mal zurück melden. Nach länger kreativer Pause bin ich nun gut erholt, voller neuer Eindrücke und Erfahrungen und mit ganz vielen neuen Fotos im Gepäck aus dem Urlaub zurück. Auch dieses Jahr waren wir wieder in der Wildnis Alaskas unterwegs. Haben die verschiedensten Tiere beobachtet, Naturwunder und Lagerfeuerromantik genossen,  eine Autopanne im großen Nichts überstanden und viele nette Leute getroffen. Wir sind über den höchsten Berg Nordamerikas geflogen, haben Gold gewaschen, sind mit einem Kajak zwischen Eisbergen gepaddelt und sind am Eis eines Gletschers geklettert. Wir haben gefroren, waren mehr als einmal völlig durchnässt und haben auch ein paar Tage Sonnenschein gehabt. Rundum ein supertoller Urlaub.

Back again

Today I want to sign me back. After a long creative break I'm now recovering well, full of new imprassions and expierences and I'm back from my vacations with so many new pictures in my baggage. This year we spent our vacations in the wilderness of Alaska, like last year too. We watched so many wildlife, enjoyed natural wonders and campfire romance, survived a flat tire in the middle of nowhere and met so many nice people. We had a scenic flight around the highest mountain of Northamerica, panned gold, had a kayak tour to the icebergs of the Columbia Glacier and we had ice climbing on a glacier. We have frozen, were more than once soaked and had also some warm days with sunshine. well, all in all a super great holiday.

Viele Grüße / See you

Yvonne

Montag, 15. Juli 2013

Unterwegs mit der Kamera

Ende Juni waren wir zum 1. Mal im Palmengarten in Frankfurt. Geplant ist es schon eine ganze Weile, doch es hat sich eben erst jetzt ergeben. Eine sehr schöne Anlage inmitten von Frankfurt. Gerade blühen die ganzen Feld- und Wiesenblumen. Herrlich!!!!! Die satten Farben und die vielen fleißigen Bienen und Hummeln die sich um die Blumen tummeln. Das schreit nicht nur nach Erholung und Entspannung, sondern ja wohl auch nach tollen Motiven. Also lehnt euch zurück und genießt den kleinen Ausflug in die Natur:

In the end of june, we went to the "Palmengarten" in Frankfurt. Planned, it's been a while, but it has only just now arising. The "Palmengarten" is a very beautiful area surrounded by Frankfurt and it´s like a botanical garden. Now blossom field and meadow flowers. Awesome!!! Such rich colors and the many busy bees and bumblebees which cavort around the flowers. This calls not only for rest and relaxation but probably also for great motives. So you lean back and enjoy the little trip into nature:


Und jetzt raus mit Euch, genießt die Natur ;)
And now, go outside and enjoy nature ;)

Yvonne 

Sonntag, 14. Juli 2013

Geht doch ;)

Freitag hat mich doch tatsächlich mein Mojo besucht. Seit langem saß ich mal wieder am Scraptisch und habe etwas gewerkelt. Ein Layout ist es nicht gleich geworden, aber 2 Karten sind vom Tisch gehüpft. Inspiriert und motiviert hat mich mal wieder Pinterest. Nun aber seht selbst:

It works ;)
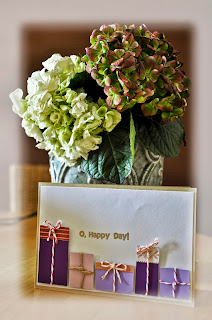
On friday I met my Mojo. Since a long long time ago I sat on my Scrapdesk and I produced something. Not equal a layout but 2 cards. The inspiration and the motivation comes also this time from Pinterest. And now, take a look to my cards:

Cardmaking: Birthday card "Enjoy your special day"

Cardmaking: Birthday card "O, Happy Day"

Ich wünsche Euch noch ein schönes Wochenende
Have a nice weekend

Yvonne


Montag, 8. Juli 2013

Zurück aus Salzburg

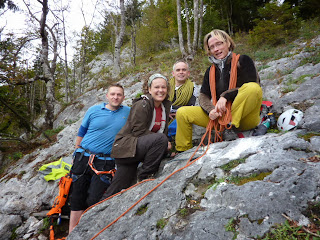
Jawohl! Mal wieder waren wir unsere österreichischen Nachbarn besuchen. Auch diesmal wieder zum Klettern. Im Frühjahr haben wir im italienischen Arco ein ganz besonders nettes Pärchen aus Österreich kennengelernt. Und genau diese besonders netten Menschen haben wir letztes Wochenende besucht. Zum Glück hat auch das Wetter gut mitgespielt und wir konnten unsere geplante Klettertour am Samstag in Angriff nehmen. Es ging über den Taxus den Plombergstein hinauf. Wir hatten wahnsinnig viel Spass, viel zu lange Standzeiten (schließlich haben wir den phantastischen Ausblick auf den Wolfgangsee genießen wollen) und sind am Ende überglücklich oben angekommen. Mit ein paar Schürfwunden und blauen Flecken mehr gab es dann auch noch das obligatorische Gipfelfoto.

Back from Salzburg

Yes! Last weekend we visit our Austrian neighbors again. And this time also for climbing. In spring we met a very nice couple from Austria especially in Italian Arco. And this very nice people we visited last weekend. Fingers crossed, the weather was good and so we could take our planned climbing tour. We have taken the route "Taxus" to get to the summit of the Plombergstein. We had so many fun, to long waiting times ( of course, we wanted to enjoy the fantastic views of Lake Wolfgang) and finally we arrived overjoyed on the summit. The summitphoto we´ve done with some more scratches and bruises. 

Klettern: Klettertour "Taxus" Plombergstein Österreich
Plombergstein

Klettern: Klettertour "Taxus" Plombergstein Österreich
Der 1. Stand

Klettern: Klettertour "Taxus" Plombergstein Österreich
bei der Arbeit ;)

Klettern: Klettertour "Taxus" Plombergstein Österreich
Gipfelfoto
Euch noch einen schönen Abend
Have a nice evening

Yvonne

Freitag, 7. Juni 2013

Reisetagebuch

Für unseren Urlaub in diesem Jahr ( es ist ja gar nicht mehr so lange hin) brauchen wir natürlich wieder ein Reisetagebuch. Eins stand zumindest zu Beginn schon fest, es sollte nicht wieder aus Graupappe sein. Ich habe lange überlegt und im Internet nach Anregungen gesucht. Und dann kam der Postbote und brachte ein neues Buch von Amazon. Da fiel es mir wieder ein. Bei Kerstin hatte ich schon einmal das Recycling einer Amazon Verpackung bewundert. Tja und schon war ich infiziert. Nocheinmal die Steilvorlage von Kerstin angesehen, mir ein paar Gedanken gemacht und schon ging es los. Ich habe gerupft, gerissen, geschmirgelt, genäht, geschmaddert, gestempelt, geklebt und gewischt. Das Ergebnis ist ganz nach meinem Geschmack.
Der Verschluss ging auch ganz flott. Eine Anleitung dafür habe ich hier gefunden. Jetzt brauche ich nur noch die Tagebuchseiten auszudrucken (Glücklicherweise befinden die sich in unterschiedlichen Größen auf meinem Rechner) und fertig ist unser Reisetagebuch. Genügend Platz für die ganzen Flyer, Eintrittskarten, Coupons und und und habe ich auch vorgesehen. ALASKA kann kommen :D

Minibook: Reietagebuch Alaska 2013

Minibook: Reisetagebuch Alaska 2013

Minibook: Reisetagebuch Alaska 2013

Of Course, for our vacation this year (it will not take so long) we need a diary. At the beginning I'll be sure that I don't like chipboard. I've considered long and look in the www for more inspirations. And then Mr. Postman ring my bell an bring a new book from amazon. Bingo, that was the reminder. Ever at Kerstin I've admired the recycling of an amazon packaging. And so I was infacted. First I looked again to the post of Kerstin. Then I made a few thoughts and the it started. I plucked, distressed, sewed, dabbed, stamped and glued. And the result: for me it´s awesome.
The closure is so very fast. If you need a tutorial, click here and scroll down. Now I only have to print out the pages for the diary (fortunately they are in different dimensions on my laptop) and the diary is finished. There is enough space for Flyer, Bills, Coupons and so on. ALASKA can come :D

Yvonne

Related Posts Plugin for WordPress, Blogger...